What are Google Chrome Flags?
Google Chrome Flags are experimental features and settings within the Google Chrome web browser that allow users and developers to test and enable new functionalities before they are officially rolled out to the general public.
These flags are hidden behind a dedicated page in Chrome’s settings, where users can access a wide range of options to customize and optimize their browsing experience. Chrome Flags are particularly useful for developers and tech-savvy users who want to stay ahead of the curve and explore upcoming features in the Chrome browser.
How to Enable Chrome Flags
It is very easy to setup chrome flags in your web browser. Here is a step-by-step guideline for you:
Step 1: Open the Google Chrome browser
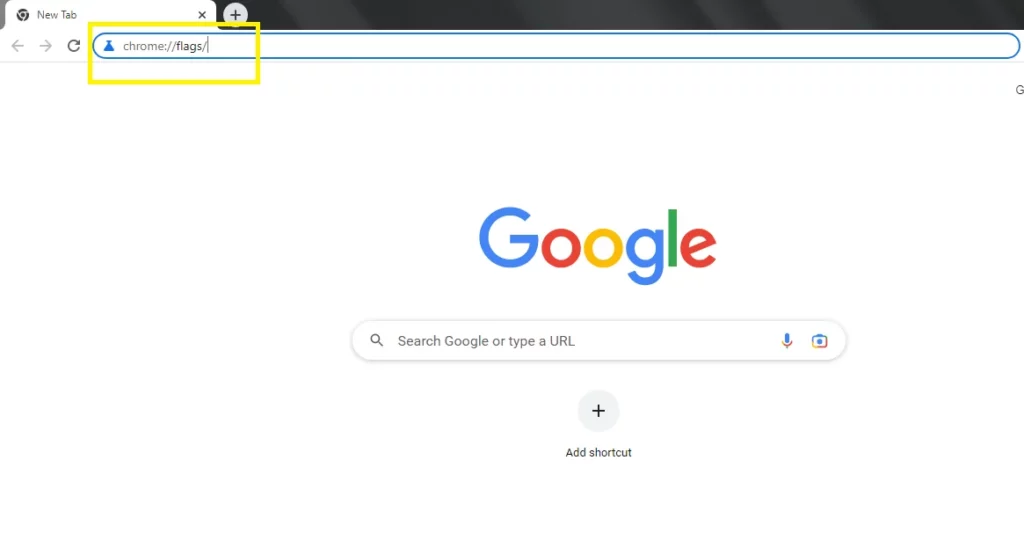
Step 2: Enter “chrome://flags/” into the address bar
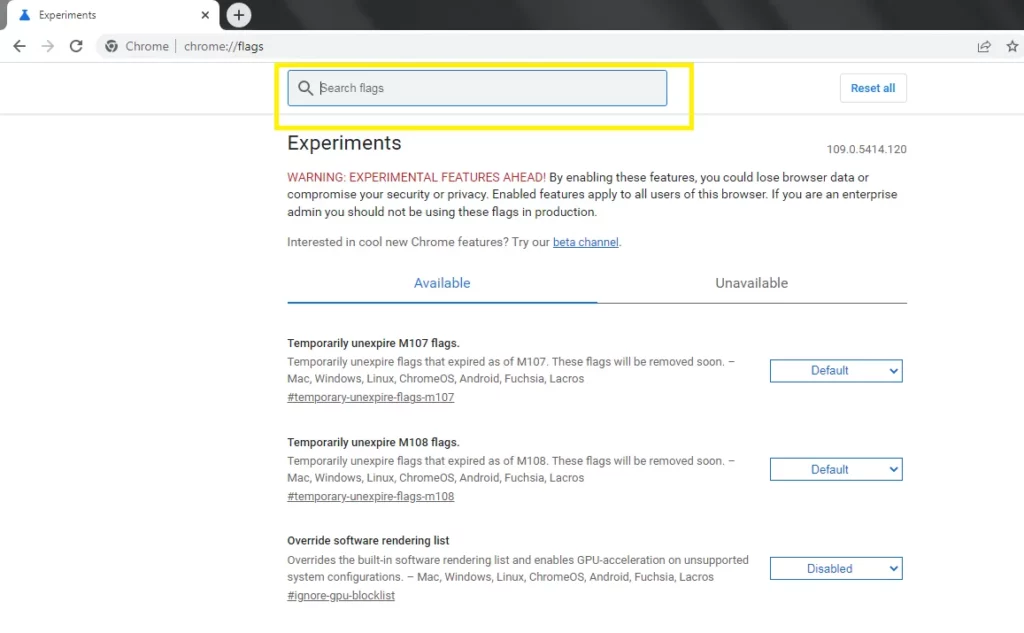
Step 3: Select or search for the chrome flags you want to activate.
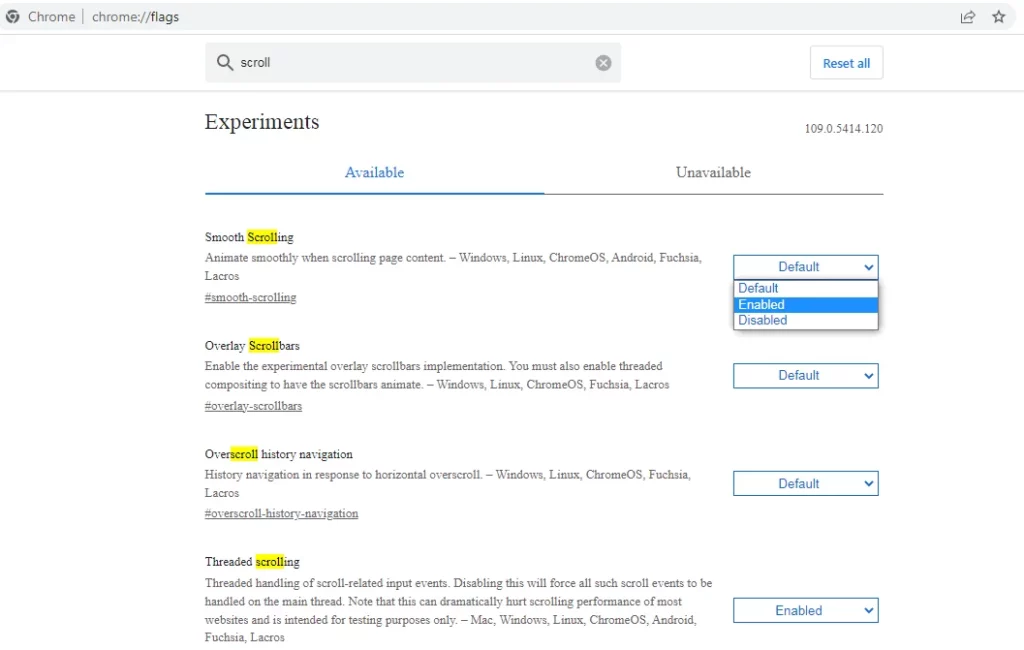
Step 4: Click or tap on the flag you want to activate.
Step 5: Select “Enabled” option next to the chrome flag.
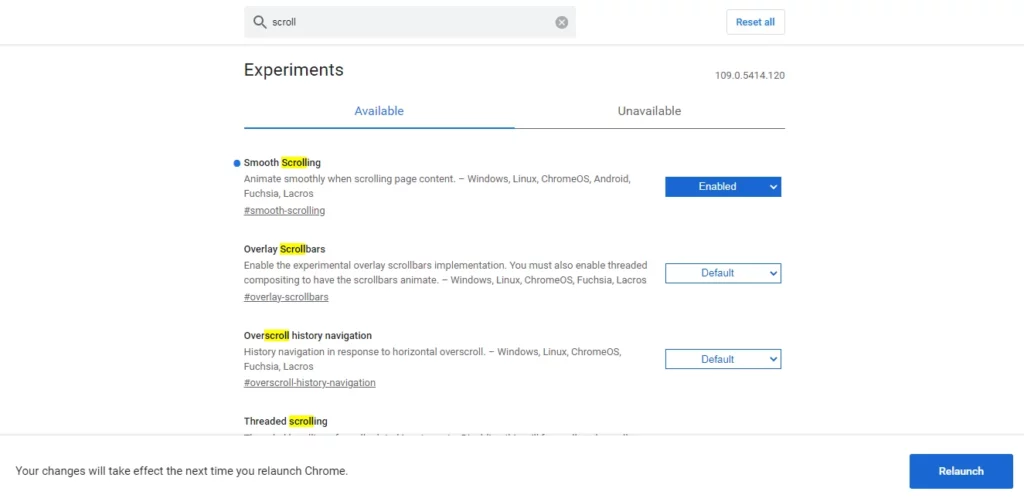
Step 6: Select Relaunch
Below, we have attached screenshots for you for each step to Enable Chrome Flag:
Step 1 – Open Chrome Browser
Step 2 – Now copy and paste this URL “chrome://flags/” to the chrome address bar.

Step 3: Select or search for the chrome flags you want to activate.

Step 3 – Click or tap on the flag you want to enable. By default all chrome flags are disabled. Select the “Enable” option next to the Chrome flag you want to activate.

Step 4 – Select Relaunch and voila!, your chrome flags you enabled will be activated.

Word of Precaution!
While Chrome Flags can provide early access to cutting-edge features and performance enhancements, they are considered experimental and may sometimes be unstable or not fully functional.
Users should exercise caution when enabling flags and be aware that they can affect browser stability and security.
You will also see the following warning from Google Chrome:

Please be sure you understand the risks before enabling Chrome Flags. Also, if you just want to experiment, you should use another browser like safari, Firefox, and/or Microsoft edge for your daily work, and use Google Chrome for experimenting. This way your data will be protected.
CHROME FLAGS ULTIMATE GUIDE: TOP USEFUL CHROME FLAGS
Our Guide to Most Useful Chrome Flags
1. Reading Mode

This flag enables a reader-friendly mode. Enabling the flag will remove unnecessary information like ads from the web page.
This is particularly useful when you are reading articles (like this one) on the internet. The flag drastically increases the readability of a web page by removing the clutter.
Enable the flag and enhance your reading experience.
2. Fill passwords on account selection

This feature is really useful when you have multiple accounts for the same website. Instead of autofill your login credentials, you will have to first select an account, and then your credentials will be filled.
3. Parallel Downloading

Parallel Downloading flag can speed up file downloads. The flag splits the download file into separate jobs and downloads them simultaneously.
While downloading small files, the difference in negligible, but you will notice that big/heavy files download faster.
4. Smooth Scrolling

Scrolling through a web page can feel rough and bumpy because chrome scrolls one line or section at a time.
The flag, Smooth Scrolling offers a better and effortless scrolling experience. Enable this flag and restart your browser, you will see the difference.
5. Anonymize Local IPs exposed by WebRTC

WebRTC (Web Real-Time Communication) is a browser developer tool to allow real-time P2P communication over the web.
It functions independently from our regular network connection because of which, even if your VPN is enabled, it exposes your IP address to any website that wants the information.
This flag conceals the IP address with Multicast Domain Name System (mDNS) protocol and prevents any leak by WebRTC.
If you’re searching for the Pincode of your location, you can use the Pincode Finder Tool to obtain the pincode within seconds.
If you plan to use PHPMyAdmin on localhost, then this article will help you install PHPMyAdmin on Windows. Read this article. How to Install Localhost/phpmyadmin using XAMPP


